What's going on in Mr. Solarz' Class?
  • Parent (Current Newsletter)
    • Additional Parent Resources >
      • Homework Guidance for Parents
      • WEX - Writer's Express
      • Our Classroom YouTube Page
      • Should I grade homework?
      • Articles that Explain my Philosophy of Teaching
      • Parents Supporting 21st Century Learning
    • Daily Photo Journal >
      • 2014-2015 DaIly Photo Journal
      • 2013-2014 Daily Photo Journal
      • 2012-2013 Daily Photo Journal
    • Tentative Schedule this Week
    • Parent-Teacher Conference Schedule
    • Monitoring Your Child's Progress in Spelling
    • Calendar
    • Printables
    • 21st Century Skills
    • Westgate Social Work
    • Bessie's Table Soup Kitchen
  • Students
    • Overflow Roll-Out >
      • Contests You Can Enter!
      • Student Quotes
      • Websites to Visit for Homework!
      • REARJMCL
    • Calendar
    • Mini-Lessons
    • I Never Knew That!
    • History Alive! >
      • Sign-In Page
      • Online Tutorial
      • History Alive 10 Quiz
    • Spelling
  • Educators
    • Mr. Solarz' ePortfolio >
      • Teacher Evaluation
      • Domain3
      • Domain4
      • My Digital Scrapbook
      • Finland
    • Workshops I've Led >
      • How to Set Up and Run a Mystery Skype Session
      • Creating Your 21st Century Classroom
      • Twitter for Educators
      • Leading Children to Pursue their Passions
      • Becoming a Global Classroom Through Mystery Skypes
      • Enriched Learning Projects
      • Developing Units with 21st Century Skills in Mind
      • Who Owns the Learning? Examples of 5th Graders Running the Show
      • A Brief Introduction to China (for 2nd Graders)
    • 21st Century Learning >
      • Resources for Teachers >
        • 21st Century Skills
        • The 21st Century Skill Series of Videos
      • Examples of 21st Century Education in Action >
        • Self-Directed Students
      • 21st Century Assessment
      • Web 2.0 Tools Used in Our Classroom
      • Articles for 21st Century Teaching (Updated Daily)
      • Motivational Speakers
    • Curricular Units >
      • Social Studies Units >
        • The 2012 Presidential Election
        • The Revolutionary War
        • U.S. Constitution and Government
        • Westward Movement
      • Science Units >
        • Energy
        • Science Fair
        • Human Body Systems in Motion
        • Human Body Systems in Motion
        • Watery Earth
    • EdChat Archives >
      • #TLAP
      • #5thchat
      • #21stedchat
    • My Philosophy of Education
    • Tips and Tricks for the Elementary Classroom
    • China (Photos)
  • Past
    • 2013-2014 >
      • Year-Long Activities >
        • Passion Time >
          • Passion Projects >
            • 2013-2014 Passion Projects >
              • Passion Projects 10/11/13
              • Passion Projects 11/22/13
              • Passion Projects 12/20/13
              • Passion Projects 2/12/14
              • Passion Projects 3/21/14
              • Passion Projects 5/2/14
              • Passion Projects 6/2/14
            • 2012-2013 Passion Projects >
              • Passion Projects 1
              • Passion Projects 2
          • Guidelines for Creating Your Final Product
        • New Assignments
        • Mystery Skype
        • Literature Circles >
          • Discussions & Signposts
          • Book Talks >
            • Submit Your YouTube URL Here
      • Spring Trimester >
        • Our Learning Experiences
        • Westward Expansion >
          • Oregon Trail Pastimes
          • VoiceThread Blog
          • Pinterest
          • VoiceThread
          • Timeline
          • Diigo
          • Google Presentation
          • Photo Stories
          • Tableaux Vivants
          • Daily Travel Log
          • Fictional Travel Log
          • Video Journal
        • WEX - Fictional Narratives
        • 21st Century Skills
        • Motivational Posters
        • Watery Earth >
          • Bodies of Water
        • Colonize Mars! >
          • Claiming Mars For Ourselves
      • Winter Trimester >
        • 100 Word Challenge
        • Stations
        • Human Body Unit
        • Out Of My Mind
      • Fall Trimester >
        • Historical Reenactment
        • Tessellations
    • 2012-2013 >
      • April/May/June >
        • Mystery Skype
        • Colonize Mars!
        • Science Fair 2013
      • February/March >
        • ThingLink
        • Human Body
        • Revolutionary War Simulation
        • Global Literature Circles
        • ISAT Test Prep
      • January >
        • Field Museum
        • Wonder >
          • Character Analyses
          • Teacher Notes for Wonder - R.J. Palacio
        • Google Groups
      • November/December >
        • 12/12/12
        • Energy Debates >
          • Energy Debates Videos!
          • Energy Debate Blog Template
        • Presidential Elections >
          • The 2012 Presidential Election
          • Presidential Election Glogs
          • Presidential Character Traits
          • Political Parties >
            • Democratic Party
            • Republican Party
            • Green Party
            • Constitution Party
            • Libertarian Party
          • Virtual Debate >
            • Education
            • Health Care
            • Social Security
            • Immigration
          • Infographic Lessons on Prezi
          • Political Polls
          • ELECTION TIME!!!
      • October >
        • Creating Your Class Badges Account
        • Properties of Quadrilaterals
        • WEX Lesson 33 - Human Sculptures
        • Energy
        • 10-11-12 What's Special About It?
        • Mr. Badynee's 50th Birthday!
      • September >
        • Constitution Day - September 17, 2012
        • Character Traits Thesaurus
        • Mad Libs!!!
        • Grammar
    • 2011-2012 >
      • May/June >
        • Science Experiments >
          • Marble Coasters
          • Bubble Busters
          • Geodes
          • Naked Egg Drop
        • Oregon Trail >
          • Reflection Activities >
            • Pinterest
            • Voice Thread/Garage Band
            • Timeline of Events
            • Diigo
            • Google Presentation
            • Photo Album
            • Tableaux Vivants
            • Video Updates
            • Daily Travel Log
            • The "Very Unrealistic Accounts" of our trip west
          • Miscellaneous >
            • Audio ThingLink Map
            • Passtimes/Games/Songs
        • Niche Theory
        • The 5 Love Languages
        • Pool Party
        • History Alive 17
        • Field Day
      • March/April >
        • Phantom Tollbooth >
          • Homework >
            • HW Due 5/3/12 by 4:00 p.m.
            • HW Due 5/14/12 by 4:00 p.m.
            • Character Forum
            • New Characters
            • New Settings
          • Roles >
            • 1 - Detail Tracker
            • 2 - Psychologist
            • 3 - Professor
            • 4 - Philosopher
            • 5 - Cartographer
        • Human Body >
          • Human Body Posters (Pre-Assessment)
          • Human Body Lessons >
            • Heart Rate Graphs
            • Exercise Graph
            • Clothespin Lesson
            • Creating Aliens
            • Hinge Joint Videos
          • How to Write a Reflection
          • Final Assessment & Reflection
        • WEX Fictional Narratives >
          • Sticky Podcasting
          • Podcasts
          • Writing Picture Books
        • Project Citizen: Westgate Database
        • Arbor Day
        • Zero Degree Party!
        • Judge Tristano Visit
      • January/February >
        • Kate Klise Assembly
        • Lara in "Annie"
        • Glogster Project
        • Science Fair
        • Valentine's Day Party
        • Teacher Appreciation Week
      • November/December >
        • Chinese Calligraphy
        • Energy
        • Energy Debates
      • September/October >
        • Rev. War Hero Projects
        • Stations
        • Halloween Party
        • Fall Links
      • Videos
  • Present
    • Passion Time >
      • Passion Time Steps
      • Submit Your Essential Question
      • Essential Questions
      • How to Post Your Passion Project Online
    • 2014-2015 Miscellaneous
    • Energy
    • Wonder
    • Grammar
  • Future
    • Learning About 21st Century Skills
    • Creating Infographics
    • Utilizing the Left and Right Sides of Your Brain
    • Comments 4 Kids
    • Innovation in the Classroom
    • Online Quizzes and Polls
    • Solar Maximum
    • Vocabulary/Parts of Speech
    • The Five Things I've Learned
    • Vialogues (Video Discussions)
    • Creating Online Videos
    • Advanced Storytelling
    • Test Anxiety
    • Responding to Blog Entries
    • Writer's Workshop Blog
    • Recipe Project (Blog)
  • e-Portfolios
    • 2014-2015 Students >
      • Student ePortfolios 0-7 >
        • 1 - Michael
        • 2 - Charlie
        • 3 - Nicole
        • 4 - Stacy
        • 5 - Bela
        • 6 - Kendall
        • 7 - Demetri
      • Student ePortfolios 8-14 >
        • 8 - Emily
        • 9 - Nicky
        • 10 - Hanna
        • 11 - Payton
        • 12 - Hasanain
        • 13 - Tucker
        • 14 - Chris
      • Student ePortfolios 15-21 >
        • 15 - Madi
        • 16 - Aidan
        • 17 - Luke
        • 18 - Kaela
        • 19 - Ryan
        • 20 - Alison
        • 21 - Lucas
    • 2013-2014 Students >
      • Student ePortfolios 0-9 >
        • 0 - Mr. Solarz' Sample Portfolio
        • 1 - Anthony A.
        • 2 - Annie B.
        • 3 - Sadie D.
        • 4 - Ellie D.
        • 5 - Sam D.
        • 6 - Ed D.
        • 7 - Luke D.
        • 8 - Keegan D.
        • 9 - Sean G.
      • Student ePortfolios 10-18 >
        • 10 - David K.
        • 11 - Ethan K.
        • 12 - Sam K.
        • 13 - Abby K.
        • 14 - Justin L.
        • 15 - Jill L.
        • 16 - Giana M.
        • 17 - Charlotte O.
        • 18 - Jack S.
      • Student ePortfolios 19-27 >
        • 19 - Charlie S.
        • 20 - Drew S.
        • 21 - Michael S.
        • 22 - Stefan S.
        • 23 - Charlie S.
        • 24 - Connor W.
        • 25 - Emily W.
        • 26 - Emma W.
        • 27 - Julia Z.
    • 2012-2013 Students >
      • Student Blogs 1-9 >
        • Blog 1
        • Blog 2
        • Blog 3
        • Blog 4
        • Blog 5
        • Blog 6
        • Blog 7
        • Blog 8
        • Blog 9
      • Student Blogs 10-17 >
        • Blog 10
        • Blog 11
        • Blog 12
        • Blog 13
        • Blog 14
        • Blog 15
        • Blog 16
        • Blog 17
      • Student Blogs 18-25 >
        • Blog 18
        • Blog 19
        • Blog 20
        • Blog 21
        • Blog 22
        • Blog 23
        • Blog 24
        • Blog 25
        • Blog 0
    • 2011-2012 Students >
      • Girls from 2011-2012 >
        • Gwendolyn Bennet >
          • Mars Travel Log
        • Dong Ling >
          • Mars Travel Log
        • Sophia Castro >
          • Mars Travel Log
        • Tristan Ely >
          • Mars Travel Log
        • Christine DuPont >
          • Mars Travel Log
        • Ira Matheus >
          • Mars Travel Log
        • Nicoletta Innazzo >
          • Mars Travel Log
        • Kade Bahari >
          • Mars Travel Log
        • Hava Raya >
          • Mars Travel Log
        • Kim Soo >
          • Mars Travel Log
        • Nabili Ngoumba >
          • Mars Travel Log
        • Britta Larson >
          • Mars Travel Log
        • Kristin Gola >
          • Mars Travel Log
      • Boys from 2011-2012 >
        • Dutch Vermont >
          • Mars Travel Log
        • Jose Leonardo >
          • Mars Travel Log
        • Otis Marley >
          • Mars Travel Log
        • Jose Rodriguez >
          • Mars Travel Log
        • Peter Anderson >
          • Mars Travel Log
        • Samir Bakri >
          • Mars Travel Log
        • Sefu Wellingtin >
          • Mars Travel Log
        • Raja Bello >
          • Mars Travel Log
        • Robert Gagne >
          • Mars Travel Log

Motivating Students to Be Reflective in Their Blog Entries Using ClassBadges.com

10/21/2012

5 Comments

 
Picture
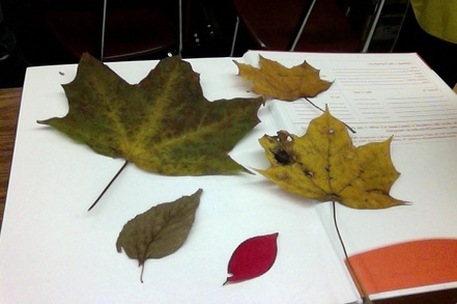
It is a goal of mine to spend a little more time outdoors with my students this year.  If you look around, the leaves are changing colors and falling to the ground these days, so I decided it was a good time to get outside!  Here is the web page I used with my students.

I found an excellent article that explained why the leaves change colors (and why each color is produced), so I had my kiddos read it with me and learn a little science.  Here is the article.

Then, we went outside to collect one leaf of every color (green, yellow, orange, red, and brown).  The kids were in heaven, as it was a beautiful afternoon and the leaves were everywhere!  It only took a few minutes, but our enjoyment level was sky-high!

As soon as we got inside, I had my students take pictures of their leaves with our laptops (using PhotoBooth).  They then created a blog entry that included the picture and explained in general or specific terms why leaves change into the colors that they do.  I only asked them to make sure it was in their own words.  Here is a sample blog entry.

It has come to my attention that not all of our blog entries have been up to my high standards, despite mini-lessons that show them what I expect, so I have enlisted a new website to help motivate my little rugrats.  We are now using ClassBadges.com, which is a start-up in beta at the moment.  They are still working out the kinks, but the developer has been very receptive to my requests and my students have really enjoyed the site so far!

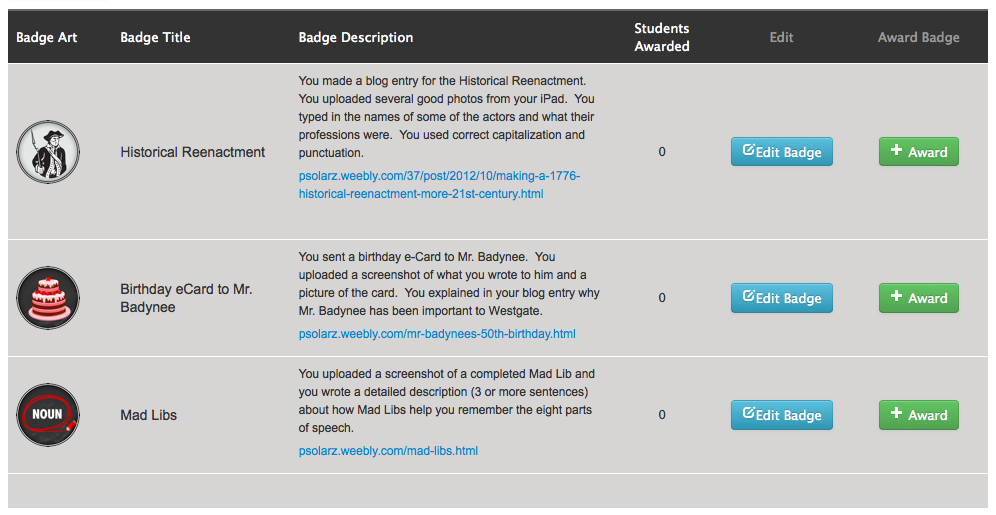
Class Badges is a website that allows a teacher to assign "badges" to their students as a reward for some sort of accomplishment.  I have decided to award badges to students who complete blog entries according to the requirements set in class.  The requirements I set are similar to a rubric, in that they list what the students need to do in order to achieve success. 

I have asked my students to be slightly competitive about earning their badges!  This is a departure from my typical stance on collaboration in the classroom.  The way I figure it, all students should be earning all badges because everyone is expected to complete blog entries according to the directions set in class.  So being competitive about the number of badges everyone earns would only promote students being responsible and finishing their work! 

Below is a look at a few of the badges I have created for my students.  Notice how the badge itself, relates strongly to the topic.  That's because teachers are able to email the website artists and they will make the requested badges for you within approximately 24 hours!  All three of the badges were requests I had made!

One thing I really like about using classbadges.com as a motivational tool is that it has gotten me to focus on what it is that I am looking for in each of my students' blog entries!  I have now written clear and descriptive requirements that students can refer to in order to achieve success on their work.  Once they complete their work, I look it over and decide if they have earned a badge or not.  If they receive the badge, they feel successful and have the feedback that they need.  If they don't receive the badge, they know that there is something missing from the requirements.  They will then go back to the assignment and make the necessary changes.  This process is making students more critical of their own work, and more responsible for following the criteria set by the teacher.

I recommend that you give it a try!
Picture
5 Comments

Using Creately.com to Help Students Collaborate on Graphic Organizers Online

10/16/2012

4 Comments

 
Picture
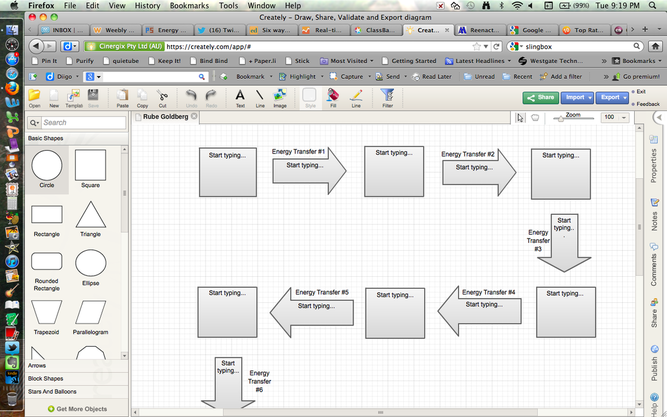
Creately.com is a wonderful platform for creating graphic organizers that can be printed or worked on collaboratively online.
Our students are coming to the end of our first science unit of the school year: Energy.  As a culminating project, they are designing a Rube Goldberg design (like "How to Build a Better Mousetrap").  They can choose to do any simple task in a more complicated way.  The example that we looked at was a child who created an alarm clock that applied sunscreen to him while in bed!  It all started with the sun shining and melting a block of ice, and the chain of events incurred, ending with sunscreen being sprayed and a horn sounding.  (For a really cool video of a Rube Goldberg project, click here!  I started this project by showing my kiddos this video and they were hyped!)  Since we learned about nine types of energy (i.e. heat, sound, motion, elastic, etc.), I asked my students to try to include as many of those types of energy as possible in their projects.

I decided to let students make the decision whether they wanted to work alone or with a partner chosen at random.  Most students wanted to work alone (we do so much collaboratively, I was perfectly happy letting them choose to work independently on this summative assessment).  Even when we work alone on projects, students still collaborate informally, but they happily take more ownership of their project and are more invested in the final product.

My students started their planning process with a printout of the above creately.com graphic organizer.  I used an 11x17 paper copy, because I felt it would make the brainstorming process smoother (trying to figure out the technology might have taken away from my students' creativity).  It seemed easy for them to brainstorm possible energy transfers for their projects.  Tomorrow, students will take their graphic organizers and draw out the actual Rube Goldberg project.  A window might allow sunlight to come in after sunrise, which melts some ice, which drips onto a pan balance, which shifts the weight of the pan balance, which pushes a switch, which...

As they draw what that looks like, they will number each step of the process and label it based on the type of energy used at each stage.  My focus will be on whether or not students have a solid understanding of each of the types of energy.  I know that during some formative assessment classroom discussions, some students were still thinking that batteries were electrical energy (they are actually chemical energy), so I will pay particular attention to that in this summative assessment.

Even though I chose to print out the graphic organizer for this lesson, I still plan to have them work with it online as well.  The reason I want to do that is because I want students to have a chance to work with the website while completing a low-stress activity.  Since their first-drafts have already been completed, I will really just be asking the kids to copy their information over!  There won't be a lot gained from that activity in the present, but as we use it more and more often in the future, I will see the benefits of getting all of our confusions out early on.  (One of the major perks of creately.com is the ability to have multiple children working on the same graphic organizer at the same time, so we will be trying that out tomorrow.)  Next time they need to actually brainstorm on the electronic graphic organizer, it will be easier for them to navigate and will therefore allow them to focus most of their attention on the creativity of the design instead of the logistics of the website.

Click here to download a PDF of our organizer to look at.

Below is the actual organizer I created:

4 Comments

10 Ways We Made Our "1776 Historical Reenactment" More 21st Century!

10/12/2012

13 Comments

 
Each year, our school district hosts a wonderful historical reenactment of Illinois in 1776 put on by the "American Colonial Experience and Beyond."  Our students are so lucky to be able to "meet" people from this time period, learn about their trades, and ask them questions.  Students get to see tools being used, watch as historical artifacts are created, and even get to touch many of them.  We're truly lucky to get this opportunity, because 5th graders learn about American history during this time period, and this experience helps to make everything much more real!

Now it's a bit of an oxymoron for me to say that we will use 21st Century skills while at the Historical Reenactment, but it's actually very true!  In addition, we continued our use of 21st Century skills once we arrived back at school as we reflected and synthesized our learning.  Here is what I mean.
  1. In preparation for the event, our students built their background knowledge on the time period and the actors personas by visiting the Historical Reenactment website that our district set up.  It's really very good, you should check it out!  (Here is the main site: http://access.sd25.org/curriculum/reenactment/ and here is the Personas page: http://access.sd25.org/curriculum/reenactment/personas.html)  (Since we haven't started our unit on Revolutionary War yet, my students were really limited in what they knew prior to this event, so this activity helped a lot.)
  2. 30 minutes prior to arriving at the school, I set a purpose for my students so they would stay focused and attentive.  They had to take pictures of the actors and of our classmates at each station.  They also had to write down each actor's name and profession so that they could talk about them on their blogs when we return to class.  Finally, I asked them to be curious and ask the actors questions, as well as answering questions that are posed to them.  (This worked!  Our attention was 100% "on" the entire 90 minutes!)
  3. In order to increase students' excitement and enthusiasm for something with which they had little knowledge of, I let them use our iPads to take pictures, and put them into partnerships to encourage collaboration in regards to taking pictures and jotting down the notes.  I directed them to take turns and help each other out.  This turned out to be wise, since some students had some trouble with the iPads later when we were emailing our photos to ourselves!
  4. When our first station was complete, I talked to the class about the importance of looking the speaker in the eyes and thanking them.  I feel that it is important to show appreciation for those who volunteer their time or even for our specials teachers and other building staff.  Each year, students catch on quickly and are often heard thanking people like the lunch ladies and the recess supervisors much more often than before!
  5. At one point, my students discovered how fun it was to mess with the actors since they were so good at staying in character!  The actors asked if our iPads were "magic slates" or "magic portrait makers!"  At that point, my students started asking questions like, "Do you like the Chicago Bears or the Green Bay Packers better?"  Of course, the actor continued the charade by saying that doesn't make any sense.  My kids found humor in this lesson, and weren't too shy to voice it, and that actually made me very proud.  I encourage my students to find the joy and humor in school - we need to take moments to laugh and smile during our long days of learning!  I let them do this for a few minutes since everyone had been behaving so well all day (and since the actor didn't seem to mind!), but they were all easily redirected when I pointed out how funny they were, but that we really needed to focus the rest of the time.  :)
  6. Once we arrived back at school, I explained the directions that would enable my students to reflect and synthesize their learning.  We would blog about our experience!
  7. I showed my students how to email the photos they took on the iPads to themselves.  Since I am still learning the iPad, and since I don't really understand which emails are blocked on my students' accounts, I was very nervous about this part of the activity.  Fortunately, my students know that whenever they can help me, I am always thankful (student-directed learning)!  So one of the kids willingly jumped onto a classroom computer and signed into her email account as I used her iPad to email her a picture.  Thankfully it worked! 
  8. Another student discovered that although we couldn't email all of our photos as once, it would accept up to four at a time.  He shared that with the class and ended up saving all of us quite a bit of time (collaboration)! 
  9. Another partnership couldn't receive any of their pictures on their email account and tried three or four possible solutions to the problem before coming to me (problem-solving and critical thinking)!  I was so proud of their efforts!  I tried three or four things as well before I learned that doing a "hard shut down" on the iPad was the the right solution!
  10. Since we used iPads and created blog entries today, this lesson also worked on the skill of applying technology effectively.  

My students are finally past the point of thinking 21st Century education is all about using technology!  Now they realize that we use technology as we work on all of the bolded, underlined skills above.  The technology we use is just what we use to practice our skills!  I love hearing them say, "Look Mr. Solarz, we're collaborating!"  And, "Mr. Solarz, are we doing a blog entry today to reflect on our learning?"  How cool!!!  :)
13 Comments

Teaching Students to Draw Conclusions Using a Voting Infographic

10/11/2012

3 Comments

 
In reading, we are working on our reading strategies as we read various books in our versions of literature circles.  So today, I decided to throw a little non-fiction into the mix.  With the election coming up, we looked at an infographic on who voted in the last presidential election broken down by all types of census statistics (e.g. men vs. women, socioeconomic factors, etc.).

In order to best understand the rest of this post, step through the Prezi above that I created and look at each individual section of the infographic. 

The way I did it in class was I projected the Prezi onto our whiteboard, stepped through it slide by slide, and discussed (as a whole class) the first few sections.  We collaboratively analyzed each statistic and drew conclusions on why we thought they came out the way they did.  After a remarkably strong classroom discussion, I stepped through the remainder of the presentation slowly and asked my students at each step to turn and tell their neighbor about why they thought the statistics were the way that they were.  Discussions were intense and sustained.  Kids actually built off of each other, listening to each others' ideas, making connections, and responding with counter proposals!  I was very proud!

Once the infographic was finished, I had my students type one or more of their conclusions onto the comments section of the blog entry (click here to read their comments).  Fair warning: Some of the conclusions sound inappropriate: racist or prejudiced against a specific group of Americans, but that is just because the infographic was constructed in that way!  Perhaps we can work on "tactful wording" in the future, but for now I enjoyed reading their reasons for the conclusions that they drew.  Now I will begin to expect them to do more of that in their reading during literature circle discussions!

I highly recommend using this lesson to teach students how to draw conclusions.  I think it is most appropriate for 4th grade and up.  I found that 50 minutes was necessary to do all that we did, but it can be done in 30 minutes if you keep a fast pace.  I hope you try it & I hope it is successful.  If you do try it, would you please leave a comment below letting me know how it went?  Thanks!!!

(I got the infographic from a Google Images Search.  I used the terms: "voting infographic."  Here is the source website: http://dailyinfographic.com/who-votes-in-america-infographic/voting-infographic)

I will also be using two other infographics related to the election to teach students to make inferences and to analyze generalizations.  You can find those lessons here.
3 Comments

Synthesizing Knowledge About Insulators to Create the "Ultimate Insulated Bottle!"

10/10/2012

9 Comments

 
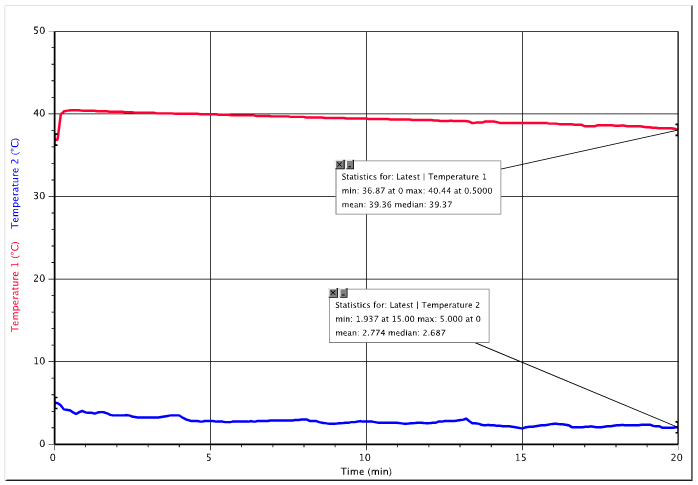
Last week, our class practiced a lab similar to this one where we wrapped a plastic bottle with one layer of a single material, filled it with hot water, capped it with saran wrap, and submerged it in an ice bath.  We measured its temperature over twenty minutes, and watched as it plummeted.  While doing so, we learned that some materials make better insulators than other materials.  Then, we read about insulating materials: which materials insulate well, why they insulate well, and how they are used in a practical application like cooking.

Today, we were given an opportunity to prove what we learned by creating the "Ultimate Insulated Bottle."  Students were allowed to use as many materials as they wanted to wrap around the same bottle from last week and watch how well the temperature stayed constant.  The only restriction was that it had to fit into a gallon-sized Ziploc bag.  Students brought in items from home such as old socks, newspaper, and bubble wrap.  I also provided some options like pieces of felt, old material swatches, and scraps of animal fur.  Students used what they learned from their books and their earlier experiment to create insulating devices that were extremely impressive!

After twenty minutes, many of their temperature probes were reporting that the water inside the bottle was only a degree or two lower than its starting temperature.  How amazing!  Although I feel that students could have done well by just wrapping their bottle in five inches of anything, it's important to note that students took an active role in determining the best materials to use and they voiced their reasons to their partners, quoting reasons from the text and from their experiences!  What a great opportunity for synthesizing!

Next year, I will make sure to require these partner-to-partner discussions and maybe even have them explain their reasons on a video that they can post on YouTube explaining why they chose the materials that they did.  This will force everyone to have a purpose for each layer.  I'm not sure that every partnership was equally thought out. 

Taking a few minutes to analyze a lesson each day is getting me, incrementally, to become a better 21st Century educator.  Focusing this lesson on synthesizing (in addition to the science concepts) made sense because it was an opportunity for students to combine what they knew before we started this unit with the experiences and knowledge they gained from our activities together.  :)

Click here to see the Directions Page for this activity.


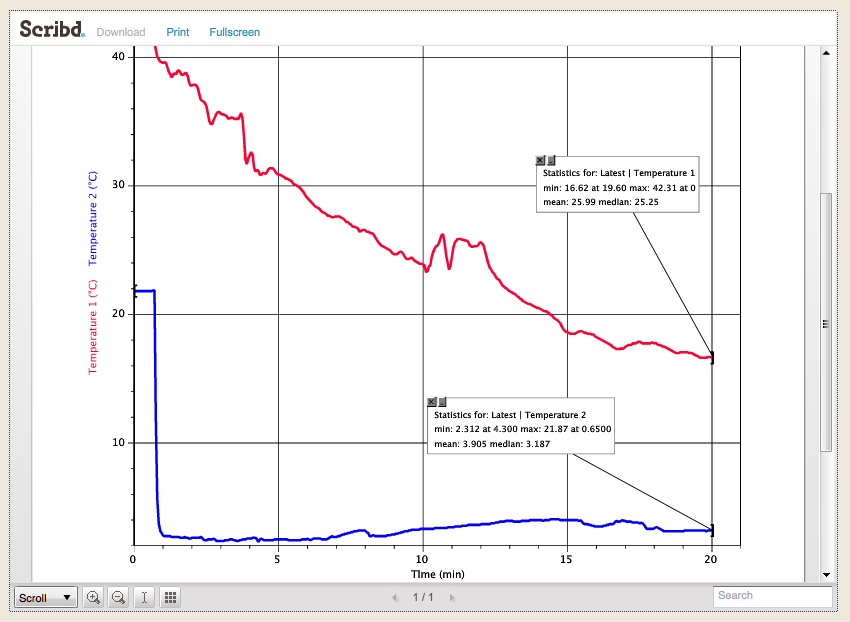
Below is a sample graph from this lesson.  Notice how the warm water temperature only goes down a few degrees in 20 minutes!  I'm impressed!!!
Picture
9 Comments

Improving Problem-Solving and Creativity with Tessellations

10/9/2012

2 Comments

 
Picture
In Everyday Math, Unit 3 spends a little time teaching about tessellations, so I thought it would be fun to take a day to explore tessellations online and with pattern blocks!  My students seemed to have a fun time, and I was very happy with the collaboration that went on during the activity.

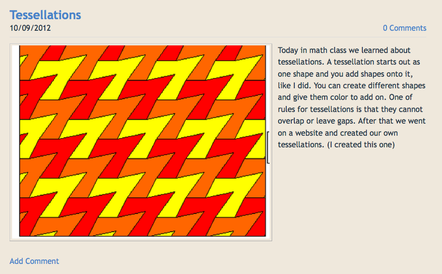
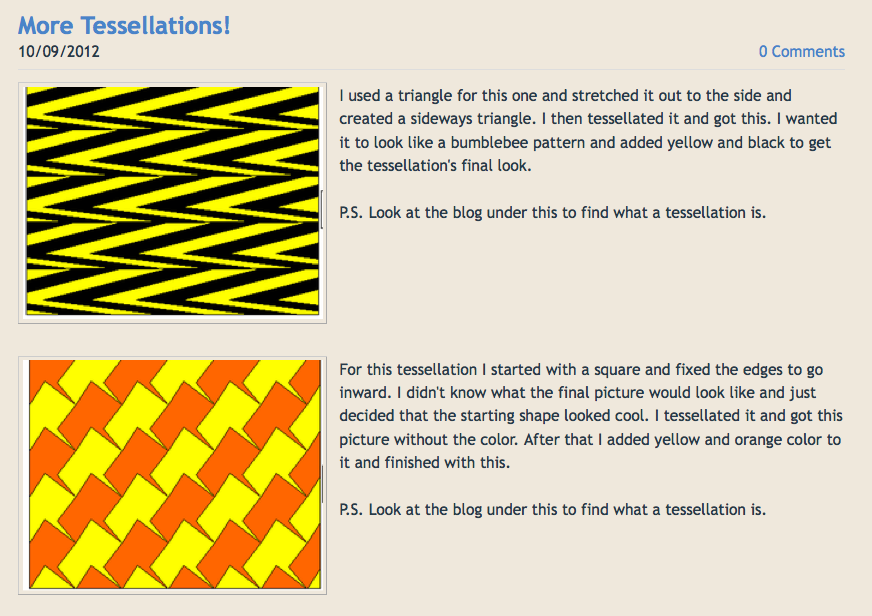
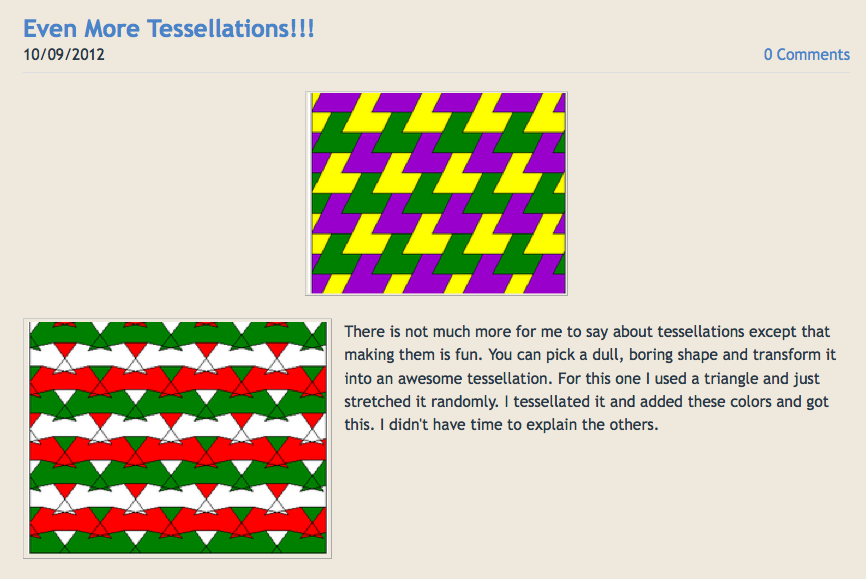
As you can see with the picture to the left and the pictures at the bottom of this post, there are some excellent ways of creating tessellations online (for free).  We used to have to buy "Tessellmania," a computer game that students would use once per year, create a tessellation, print it out, and hang it in the hallway.  Now, we can spend a few minutes in class making dozens of these, taking a screen shot of each, and posting them on our blogs for all to see!  It's definitely better on the environment, and more people can see these tessellations than before!

All of the computer-generated images in this post were from the same student - they obviously got into it and had some fun!  I was thrilled to see my students so engaged and enjoying their time in math class.  I was able to walk around and clarify misconceptions because everyone was self-directed, which freed me up to do what I needed to do! 

Some of the students who were working with the pattern blocks didn't realize that a pretty pattern is not necessarily a tessellation.  I made them show me how their pattern tessellates up, down, left, and right using the same pieces.  I had them separate their original shape from the repeating shapes so that they could see which pieces made up the actual original.  Some students had trouble with this and others saw it right away.

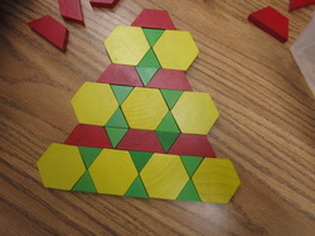
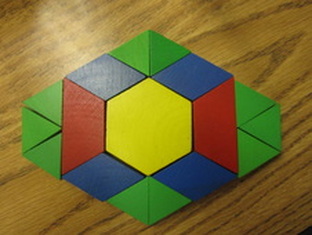
Take a look at the pictures below.  The pattern block patterns shown are not actually tessellations until they repeat left, right, up, and down.  The one on the left is nearly perfect, but is missing a couple green triangles to make it complete.  The one on the right is the original shape that would need to be repeated up, down, left, and right in order to call it a tessellation.  (So it is not a tessellation as is.)  But it's pretty, huh?!  :)

I highly recommend doing this with your students if you teach tessellations because the computer-generated images are beautiful and encourage creativity, and the pattern blocks encourage critical thinking and pattern-creation.  While students are working online, they are tinkering with the design, the shapes, the colors, and the overall appearance of the tessellation.  They are comparing their final products with each other and analyzing what makes their tessellations attractive.  While working with pattern blocks, students are scrutinizing over the shapes to determine which ones should be used, which ones can tessellate, and how many of each they need to have in order to prove that their pattern tessellates.  This critical thinking is important to synthesize what they've learned from our in-class lesson and their experience online.

I also will usually have my students create a slide tessellation and a rotation tessellation on a piece of construction paper by cutting out a shape according to specific directions.  We have not done that yet, but will if we discover that we have a little extra time before our test.  :)

Here is a link to the directions page we used in class - feel free to use it with your kiddos!
  There are four links.  The third one is the one to use to create tessellations like we did.

Picture
Picture
Picture
Picture
2 Comments

21st Century Birthday Wishes for Our Ancient Principal (He Turned 50 Today!)

10/9/2012

6 Comments

 
Picture
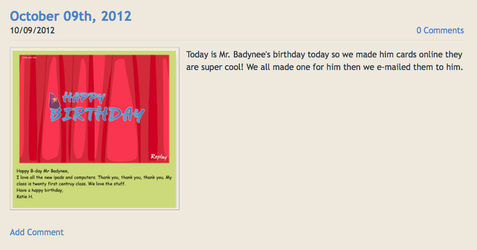
We had to do something "techie" for our principal on his 50th birthday!  After all, a lot of what we are doing in class this year wouldn't have been possible without his blessings and support!

We have 12 iPads in our classroom thanks to Mr. Badynee's belief in 21st Century education.  We use laptops daily thanks to his belief in 21st Century education.  We learn far more collaboratively than ever before thanks to his belief in 21st Century education.  I have the freedom to plan integrated simulations thanks to his belief in 21st Century education.

Basically, my principal has given my the opportunity to teach in a way that utilizes my strengths, my philosophy, and what I feel is best practice.  He has allowed me to channel my passion into quality educational practices.  I come to work much more satisfied and happier because I am able to be the teacher that I want to be.

So we sent our principal Birthday eCards!  I explained to my students how Mr. Badynee has had a big influence on what is happening in our classroom and in the school, and the students were off - writing their birthday card wishes and sending them through email.  (Here is the web page we used complete with links to birthday card sites.)

When I told them that Mr. Badynee was turning 50 today, they were shocked!  "I thought he was 30-something!"  "Yeah - I didn't think he was that old!"  The kids were heard saying.  Of course these are the same kids who thought I was in my 50's, despite being 36 years old!  (I'm not sure how to handle that!)  :)

Soon, we began to receive thank you emails back from Mr. Badynee.  The poor man spent quite a bit of his 50th birthday reading the cards, commenting on them, and sending thank you cards back!  I shared each of them with our class and the student it was intended for, and they all appreciated his time and effort.

Overall, it was a positive experience.  Students learned how easy it is to send someone a card for any occasion for free!  They learned the importance of thanking those who support you and what you believe.  They learned that despite the time it takes, sending a thank you card back is a very nice gesture!  For a 20-minute lesson, many of my students benefited quite a bit!

Thanks for everything Caz!  And Happy Birthday old man.  :)

6 Comments

Teaching and Assessing 21st Century Skills: Reflection & Synthesis

10/6/2012

6 Comments

 
This is part 3 in a series - Teaching and Assessing 21st Century Skills
Reflection and Synthesis are two skills that are very necessary for 21st Century learners.  Too often, students miss the point of a lesson or a concept because we introduce it, spend a little time practicing it, but then we are off to another skill or concept.  Students need time to think about what it was that they learned and combine it with what they already know to make the meaning more long-lasting.  21st Century learners are spending more time reflecting and synthesizing so that their knowledge is more likely to be remembered and understood.

I work with my students on their reflection and synthesis skills all throughout the year.  Some of those opportunities include:
  • students creating individual e-Portfolios with reflective blog posts (see this student post) (with teacher instructions here),
  • end of unit assessment opportunities using photos, video, and a narrative (like this one),
  • creating videos and posting to YouTube to explain learning immediately after an experience (see this post),
  • reflecting on their time in class so far in the school year (see this post), 
  • Synthesizing learning to create a virtual debate on YouTube (see this post),
  • classroom discussions to end lessons, making sure meaning has been made and stored, and
  • individual or small group literature reflections (see these resources).

Also, here are some fun reflection activities students completed while learning about the Oregon Trail:
  • Google Presentation
  • Pinterest
  • Voice Thread
  • Time Toast (Timeline)
  • Photo Album
  • Tableaux Vivants
  • Video Journal
  • Daily Travel Blog
  • Unrealistic Travel Blog

Here are some of the specific reflection and/or synthesis skills I try to teach my students:
  • whether time is given in class or not, take time to reflect and think about your learning,
  • combine what you already know with what you are learning now to make it easier to understand,
  • when given time in class to reflect, try to prove to your teacher what it is that you learned, and
  • I created this web page to help my students make their reflections better.

By learning these skills now, students will have years to practice and get comfortable reflecting on and synthesizing their learning.  They will remember things better, understand things deeper, and be a more valuable member of a team, classroom, or company.

In order to assess this skill, I have taken the guidelines from the Partnership for 21st Century Skills.  They are a wonderful resource, and have graciously allowed me to reuse their information on my 21st Century report card located at the end of this post.  In addition, I have used many of the ideas from Habits of Mind by Art Costa in my behavior descriptors. 

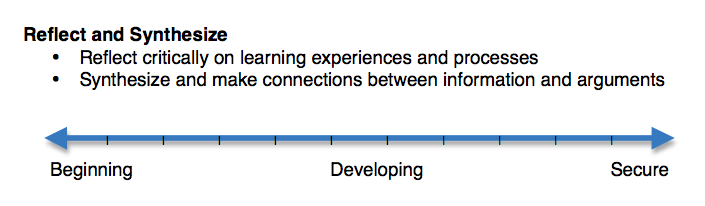
Below is a list of the two behaviors that I look for when assessing my students on "Reflecting and Synthesizing."  Under the behaviors is a sliding scale that has ten marks on it where a dot is drawn to represent their current aptitude.  The labels, "Beginning," "Developing," and "Secure" attempt to describe the relative position of the dot that is drawn, in terms that make sense.  I have used this as a self-assessment with my students (which leads into setting appropriate goals), and I also complete one and attach it to their actual report cards.
Picture
I try to explain to parents that the value associated with each of the 32 skills on this 21st Century report card are not as important on their own, rather they are more valuable when compared across all skills.  If a student is getting dots all within the Developing and Secure range, then that student's relative weakness are the skills in the Developing range and a student's relative strengths lie in the Secure range.  When presented like this, parents were more apt to appreciate the data.  When presented strictly as scores on the slider bars, some parents felt the scores were a bit arbitrary and that they didn't know what to do with the data.

When scoring my students, I preferred to look at a skill, look at the behaviors associated with the skill, and determine who in my class was performing at a "10" level.  Generally speaking, no one was at the beginning of the year, but by the end of the year I felt that several were!  After recording the tens, I would go to the nines, etc.  Wherever I ended up, that was the lowest score.  I found myself having trouble giving out ones, twos, and threes at the end of the year, but they were fairly common early on.

I had some great discussions with some of my students about areas that we disagreed on last year.  They thought they were a ten when I thought they were a three, for example.  All I needed to do was point out the behaviors that were listed above.  I would ask the student, "Can you give me an example of a time when you performed that behavior in front of me?"  The answer was often, "No, but I do it all the time!"  I would just reiterate the importance of doing it when the teacher can see it.  At that point on, these students had more motivation to do the behavior because they had to prove me wrong!!!  Either way, I was happy because my students were performing the behaviors that 21st Century students need to perform!  And it's like dominoes.  When one does it, they all start to do it.  :)
6 Comments

Transforming Our Classroom Environment to Create Excitement and Increase Motivation

10/4/2012

4 Comments

 
I love changing around the layout of my classroom, so that when the students walk in in the morning, they say, "Wow!"  Creating a classroom environment that is flexible and adaptable is important when trying to teach children in 21st Century ways.  Today was one of those minor transformations, but it got the students excited about the lesson and motivated to learn!

At the front of my classroom are four trapezoid tables that form a semi-circle.  I typically use this for guided reading and guided writing, for students to sit at when taking notes from the board, and when doing RtI activities with my kiddos.  It makes a nice barrier between the students' desks and the "stage" as I like to call it.  The students' desks wrap around the set of tables and provide a clear line of sight for everyone to the board.  Since I am not a very traditional teacher, I don't spend a ton of time in front of the board lecturing, but I do use it for math and when giving other short bursts of information.  Plus, that's where I project my computer screen on the board!

Today, I needed a space for 12 partnerships to share a laptop, two temperature probes, and have access to an ice bath for our experiment on insulators.  I decided to use the semi-circle of tables as the outer ring of laptops (see the picture above), and use a fifth trapezoid table (from the hallway) to hold the ice bath in the center.  Luckily, this fifth table was slightly shorter than the other tables, so any water spillage would go on the floor instead of on the laptops. 

I knew that the 12 cords from the temperature probes would be in the way if I let the students encircle the ice bath, so I only allowed student access to one side of the table.  Of course, as you can see in the pictures above, they were squished!  Since the experiment required someone to hold a bottle in the ice bath for 20 minutes, I had to ask six students to hold their bottle and one other partnership's because we couldn't fit anymore people back there!  (Next year I will try to create two separate spaces with a similar setup so we aren't so squished.)

Ultimately, it went well!  Once the six students kind of found their "happy place" and hunkered down for 20 minutes of waiting, everyone seemed calm and content.  We were experimenting to see which of the six materials we were testing would make the best insulator between a bottle of hot water and an ice bath of cold water.  The materials we tested were: aluminum foil, wax paper, plastic wrap, polyester batting, felt, and carpet padding.  All materials were wrapped around the bottle once and put into a plastic bag (to keep the variables the same).  After 20 minutes were up, we compared the final temperatures of the hot water in each bottle.  We discovered that the polyester batting was the best insulator (it kept the temperature hottest) and the aluminum foil was the worst (the temperature was almost the same as the ice bath).  Here is a sample graph that was created for plastic wrap:
Picture
I had the students blog about their experiment and write about what they learned (feel free to click on some of their e-Portfolios and check them out!).  They were told to upload their graph and data chart as part of their response.  We are just beginning to learn about blogging, and time is tight, so our responses have been very short and minimally reflective.  These will be improving over the course of the year!

Although I moved very little furniture around this time, the table being in a new place and having 12 computers set up was enough to get my kids excited about the science lesson that we were participating in first thing this morning.  So don't be afraid to move things around in your classroom and watch the kids come in and be surprised!  It can be very exciting and motivating and can really boost the processing power of the students if harnessed correctly!  Of course, be ready for them to have a lot of energy because that excitement can't stay bottled up for long!  :)
4 Comments

Learning About Conductors Through a Demonstration Using Butter, Warm Water, and 5 Rods Made of Different Materials

10/2/2012

3 Comments

 
The graph above is interactive.  Hover over it and notice the five circles that appear.
Hover over each circle to see when on the graph each butter pat slid down the rod.
Thanks to thinglink.com!
Today, our class learned about conductors (insulators are coming on Wednesday) as they relate to heat transfer.  We predicted that the type of material an object is made of determines its rate of heat transfer, so naturally we needed to test out various materials!

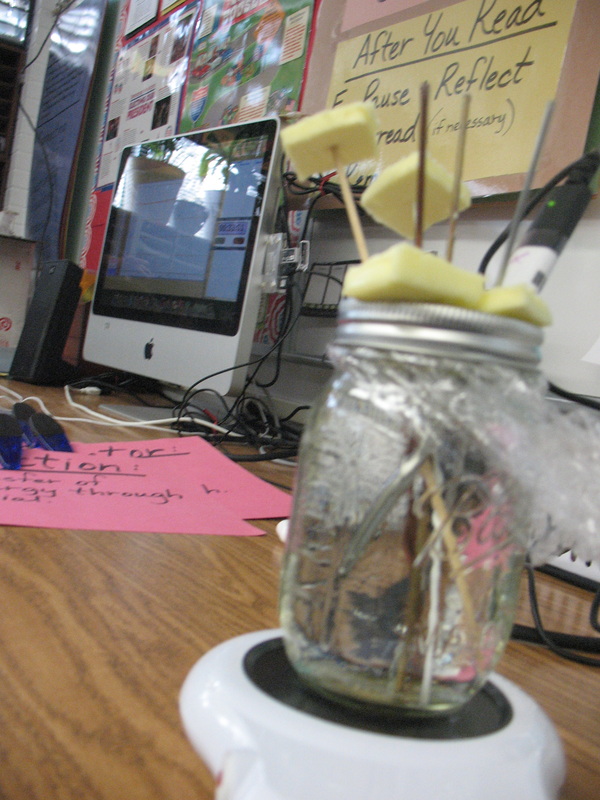
We used five rods made of different materials: brass, copper, aluminum, plastic, and wood.  On each rod, we placed a frozen pat of butter at one end (see the picture for a better idea).  We placed each rod into a glass jar filled with hot water, sitting on a hot plate which allowed the water to continually heat up.

I placed a temperature probe into the water to track the temperature during the experiment.  The results of that are in the data chart on the left (and the graph above).  The top of the glass jar was sealed with plastic wrap to contain the heat, and all rods and probes were poked through the plastic wrap.
This experiment was actually done as an demonstration.  We discussed the procedure and materials of our experiment, and then set it up and conducted it.  We observed the butter melting and sliding down each rod, and recorded the data in our science journals.  Students discovered that the metals seemed to conduct heat faster or better than the plastic or wood did.  We discussed how brass and copper are good conductors, but how aluminum is generally considered a poor conductor.  This was an anomaly in our results.  Aluminum should have slid later in the experiment.  We discussed how experiments are far from perfect and that results are often incorrect or inconclusive due to errors in the set-up or other variables.  (For instance, one student kept bumping the table during the experiment and we had to ask him to move!!!)

This was a good experiment for understanding what a conductor is.  The main reason it was so valuable was because of the discussion we were able to have during and after the experiment since we used "conductor" so often.  We discussed what properties might have made a material a "good conductor" and what would make it a "bad conductor."  We avoided the term "insulator" because that comes later.  Although we don't know the exact scientific reason why a good conductor is a good conductor, we did analyze the materials, make logical conclusions, and use prior knowledge in our conversation.  Lots of great thinking and learning going on in this lesson!  :)
Picture
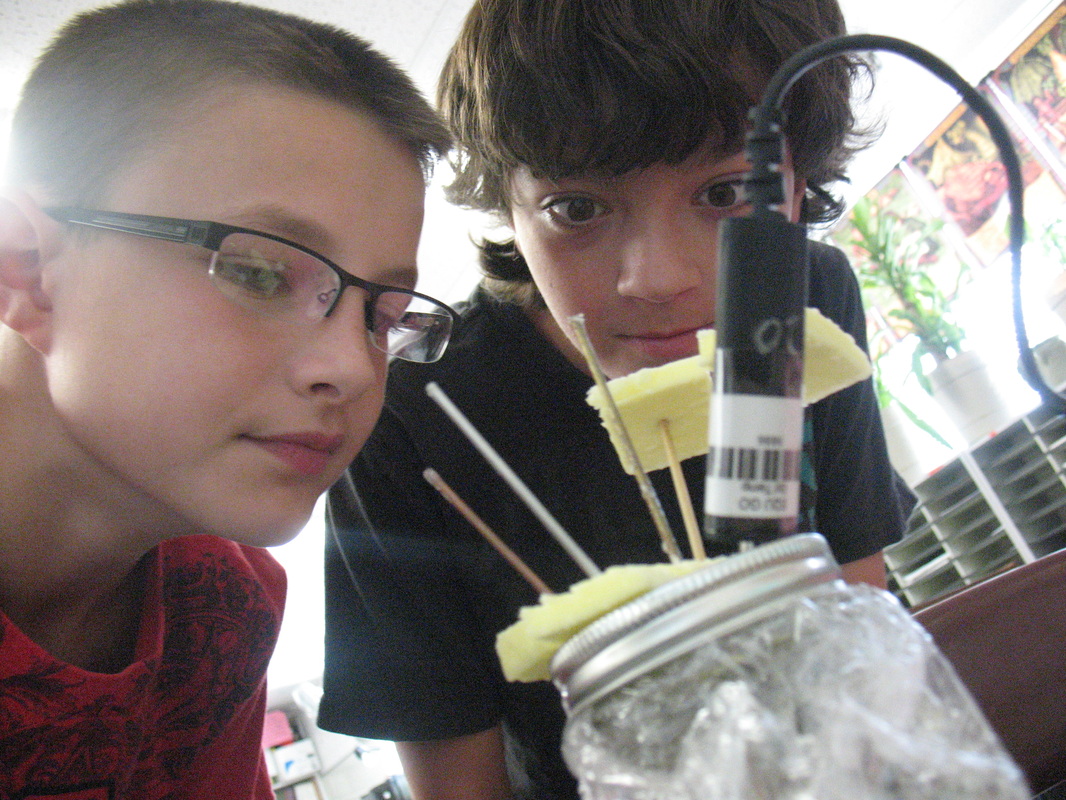
Above: Ryan and Erik watching butter melt - how exciting!  :)

To the right: Our butter pats on five rods made of different materials (brass, copper, aluminum, plastic, and wood).
Picture
3 Comments
<<Previous
    Picture
    Picture

    My ePortfolio

    I am Paul Solarz, a 5th grade teacher in Arlington Heights, Illinois who is loving 21st Century Education. Please become part of my PLN on Twitter: @PaulSolarz

    Follow @PaulSolarz
    Tweet

    Archives

    April 2014
    February 2014
    January 2014
    December 2013
    November 2013
    October 2013
    September 2013
    August 2013
    May 2013
    April 2013
    February 2013
    January 2013
    December 2012
    October 2012
    September 2012
    August 2012
    May 2012

    Categories

    All

    RSS Feed

    Tweets by @PaulSolarz
Powered by Create your own unique website with customizable templates.